Tuesday, October 12, 2010

Lou Hanson Pottery

Lou Hanson, a fellow One Stroke Instructor (we did our certification together), is doing some wonderful one stroked cake stands.  I can't wait to make a matching cake for it!


Check out her website CLICK HERE

Saturday, May 29, 2010

It's been a while since I blogged and a long time since I picked up a paint brush.  The urge is still there and I so want to paint, but time just doesn't permit.

My stepson took over my little studio (converted spare room) and so I moved into a large walk in closet and set up all my paint things, but it doesn't work for me and I just can't muster up the courage to pull everything out and put everything back again, so instead I do nothing!  Of course the wonderful sunshine outside beckons and it's useless painting outside in this heat......well that's my excuse!

I have lots of new plans and projects and have a teaching assignment in London in September where I'll be teaching painting with the One Stroke technique onto cakes.  It's all good fun at least my teaching forces me to get my paints out.  The most exciting project is the 'soon to be opened shop' that we are still in negotiations with, still in Dundas but something a little different.

Happy painting!

Thursday, April 29, 2010

More From Sue Gait

           We will be learning the basics of Landscapes.
You will need to take these classes in order to go forward to create other landscapes with me. 
It will give you more of an understanding of how things are created and easier as we go ahead.  There is a total of 4 classes that need to be completed at a cost of $25.00 per class.
MAY 8th One of GET TO LEARN LANDSCAPES.#1 Cost$25.00 9.30-11.00 Skies & Clouds
 
MAY 15TH Landscape. #2 Cost$25.00 9.30-11.00 Water and Moving Water
 
MAY 21-24 LONG WEEKEND  WELCOME SUMMER
 
MAY 29TH Landscape. #3 Cost$25.00 9.30-11.00 Trees & Bushes
 
JUNE 12TH Landscape. #4 Cost$25.00 9.30-11.00 Mountains and Rocks

Tuesday, April 20, 2010

More Practice Sheets - Co Op Girls


You've all done so well with your painting classes.  Here are a few more practice sheets for you to be getting on with.

Remember to bring your Magic Canvases to class on Thursday along with your brushes and palettes.

See you Thursday for our last class in this series.  For those of you who wish to carry on, please contact me!

Friday, April 9, 2010

Send Me Your Pictures

Have any of your students got pictures of your work that you would like to add here?  Please just send them in with your name and I'll be happy to post them for you.

Paint Your Own Greetings Cards

Create a wonderful Mother's Day or Birthday card using this simple design.  Blank cards to paint on are available from the Dollar Store, Michael's, Walmart and from most craft stores and stationers.  You can also make your own, but make sure that you choose gloss paper since ordinary paper goes a little crinkly.
Enjoy!

Vase Project Idea


Remember to clean your glass bottle well with alcohol before painting and use the Folk Art Enamels for best results.

Enjoy!

Thursday, April 8, 2010

Paint A Parrot


MARY ELLEN LOCKYER’S CLASSES
MARY ELLEN LOCKYER BOB ROSS CERTIFIED INSTRUCTOR IN
LANDSCAPE, FLORAL AND WILDLIFE

DATE: April 17th

LOCATION: Sue Gait’s studio
19 Richards Ave.,

TIME: 9.30-2

ALL SUPPLIES PROVIDED FOR CLASSES USE

Thursday, March 4, 2010

Co-Op Girls - Leaves Practice Sheet


Wednesday, March 3, 2010

Co Op Girls - March Break

Here are some petal sheets for you to use to practice your techniques during your March Break.
Be careful to read the instructions properly, use the correct size brush for the petal that you're doing and if possible the same colour paints.  Keep your brushes clean and your bristles fully loaded.  Push down for a larger petal and always start and finish on a chisel edge.
Only make one track unless you can't possibly help it.  Do not use water to thin paint, use floating medium.  

Monday, March 1, 2010

Co-Op Girls - March Break

If anyone wants some painting projects to do during March break please let me know.

Friday, February 26, 2010

Co Op Girls - Sixth Lesson

Our next project is a bird house.  This looks complex, but, as you all well know, the One Stroke technique is so much easier than you think.

Don't forget:


  • Your brushes
  • An old shirt
  • A cloth
  • Your palette
  • Your practice pad
Your project is a wooden brush carrying case.  You're going to love it!

Co Op Girls - Fifth Lesson

The rose is the classic flower of One Stroke painters.  it is somewhat more difficult than the other flowers because it has so many components, but once mastered it is so beautiful and well worth all the practice.

First start by practicing the bud, when you have mastered the bud, the sea shell which is the petal shape that the whole rose is made of.

The comma stroke comes next, to make the small petals that go around the bud.

When practicing, remember to leave a hole in the centre of the first five petals, if you don't, your second row of petals will be as big or barely bigger than the first row and it won't look like much of a rose.

Have fun!

Wednesday, February 17, 2010

Co Op Girls - Fourth Lesson


This weeks lesson is going to focus on sunflowers and their leaves.
Sunflowers are very splashy and large and work well for many projects where you need just one or two main feature decorations and if you have to cover a large surface.
You will be learning a new technique called "pouncing" with a brush that we've not used yet in class which is called a "scruffy".
These practice sheets feature the sunflower leaves on the right and just a little sample of the sunflowers on the left, the ones that we will be doing are much bigger than these.  But take a look anyway and familiarize yourself with the technique.
Please bring with you:


  • Your brushes
  • An old shirt
  • An old cloth
If you have any questions please contact me.

Project:  Small paper box

Last Call - Oil Painting Class


We still have room for the oil painting on Feb 20th. 9.30-1  Let me know.  Your cost is $85.00 lunch included plus all supplies for the class.


ARTATHOME.ca
  
With SUE Gait CUSTOM WORK AVAILABLE Cert-a-bee etchall® Master Etcher
Painting & Etching Classes Offered
Certifying Elite One Stroke Instructor
Certified Level ll Instructor

Thursday, February 11, 2010

Painted Cake


Part Painted and partly sugar flowers.  Vines using One Stroke techniques.

Wednesday, February 10, 2010

Co Op Girls - Third Lesson

It's Valentine week so we're going to be doing something that fits the moment.  We will be painting a heart shaped tin that can be filled with home made cookies or chocolates and given as a gift.
Please bring:
  • an old shirt to protect your clothes
  • your brushes
  • a cloth to wipe your hands 
  • paper towels
Here is a recipe for making red velvet truffles:

Ingredients:

  • 1 box red velvet cake mix, and ingredients to make the cake
  • 1 can (16 oz) prepared cream cheese frosting
  • 1 lb candy coating, white or dark chocolate
  • Sprinkles or small candies to decorate (optional)

Preparation:

1. Prepare and bake the red velvet cake mix according to the directions of the package for a 9x13 cake. Once baked, allow the cake to cool completely.
2. Crumble the cake into a large bowl and work it with your hands until it is in small pieces. If desired, reserve a few spoonfuls of crumbs to use as decorative toppings on the finished truffles.
3. Spoon three-fourths of the frosting into the bowl and stir with a rubber spatula until the mixture is well-combined. It should be very moist and hold together if you squeeze a ball of cake between your fingers, but not too wet or greasy. If the cake mixture is still a bit dry, add more frosting to get it to the desired consistency.
4. Using a small cookie or candy scoop, scoop out small balls of cake and roll between your palms until they are round. Place the cakes balls on a baking sheet covered with aluminum foil, and refrigerate them while you prepare the candy coating.
5. Place the candy coating in a medium microwave-safe bowl and microwave it until melted, stirring after every 45 seconds to prevent overheating.
6. Using dipping tools or a fork, submerge a cake ball in the melted candy coating. Remove it from the coating and drag the bottom across the lip of the bowl to remove excess coating. Replace the dipped truffle on the foil-covered baking sheet. If desired, top it with a sprinkle of cake crumbs, small candies, or other decorations while the coating is still wet. Repeat with remaining cake balls.
7. Refrigerate the truffles to set the coating completely, about 20 minutes. These cake truffles are best served at room temperature, and can be stored in an airtight container in the refrigerator for up to a week.

Sunday, February 7, 2010

Reusable Teaching Guides aka RTG

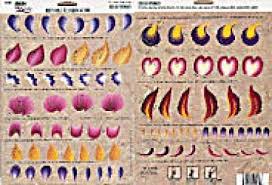
These are sold where you find other One Stroke paint supplies.  Use these unique laminated worksheets to practice your strokes.  To learn and practice, paint right on top of the illustrations and follow the strokes, then clean and paint again until you have perfectly mastered the technique.  The blank RTG are a way to practice once you've mastered the strokes with the illustrated guides.
You can also lay plastic sheets over the worksheets in the One Stroke books (there are hundreds of them!) so that you can practice the strokes on the sheets.
Buy yourself an artists pad which is suitable for acrylic paints.  Use your book to practice in (don't cheat and tear out any pages) you can track your progress as you practice.

Friday, February 5, 2010

Pallets

I just wanted to give you a quick reminder about pallets.  Of course you can continue to bring the pallets that I provided for you, however, if you want to get a little more 'fancy' and don't want all the messy clean up, you can buy an artists pallet from Walmart (about $3) and a roll of Glad Press 'n Seal (not usual Seran wrap, it HAS to be Press  'n Seal) Simply cut off enough to cover most of your pallet and stick it on with as few wrinkles as possible then just bring it to class.  When class is over simply peel off the Press 'n Seal and throw it away.  If everyone does this we will need less clean up time after class so that you have a few extra minutes to paint.

Michael's Money Off Vouchers

MichaelsClick here for Michael's Coupons if you want to buy paints or any other art equipment print these off before you go to get 40% off one item.

Thursday, February 4, 2010

Excellent........

........excellent, you girls are the BEST!  I am amazed at how well you all did on this mornings project and feel very proud of you all.  The brush strokes were very well executed and the colours and mixing was wonderful....keep up the good work.
I really recommend you all to purchase at least a couple of paints so that you can practice at home (don't forget to use the practice sheets provided so that you don't get into bad habits).  Todays colours were:
  1. Wicker White
  2. Berry Wine
  3. Thicket
  4. School Bus Yellow

With these four basic colours you can mix and match, try using Berry Wine and School Bus Yellow for your flowers and Thicket with Wicker White for your leaves and there you have another unique combination.
We painted the picture frames with Peridot from the Metallic collection of Folk Art Paints, metallics are good for backgrounds and dry fast with a nice sheen.  We will be using metallic paint again during the course.
Some of you mentioned how much you enjoyed having the "ambiance music" playing, if you have a favourite CD of classical or very soft music (no rock and roll or else you'll all be turning into Picasso's instead of Donna Dewberry) you are quite welcome to bring it along.
Please remember to bring a cover up shirt with you........we can even paint it in class and make it really cool if we have a few moments after each class.
Next weeks project is a Valentine Project....more information to follow as well as the pictures I took in today's class.

Any questions?  Just leave your comments here and I will get back to you ASAP.  Happy painting!

Tuesday, February 2, 2010

Co-Op Girls - Second Class

For Thursday's class you will need to bring your brushes, styrofoam pallet and your paint pads from last week and please remember to bring an old shirt to protect your clothing.

We will be building on your skills from last week and tackling the rose bud and leaf border which we will be painting on to a picture frame.

The two girls that couldn't be with us for last weeks lesson will have a bit of catching up to do, but I have prepared their frames in advance so they can learn last weeks techniques while everyone else prepares their frames.
If you have any questions at all, please leave them in the comment section below by tomorrow evening at the latest so that you are prepared by Thursday morning (I do not check my e-mail before coming to class.)
Looking forward to Thursday!

In Reply....

Someone asked if it was necessary to buy the Double Loader and I can"t find the post in order to answer.  No, you don't need the double loader the styrofoam pallet will do just fine for now.  As you progress you will get a feel for what you need and what you would like to upgrade to, you can build on your collection of colours, brushes and equipment and even maybe a book or two, but for now there shouldn't be anything that you need to rush out and buy.

Monday, February 1, 2010

Folk Art Enamels Paint

 This is an optional paint that can be used on glass and ceramics, as well as on metal.  Folk Art Enamel paint is a highly pigmented acrylic polymer formulation with excellent hiding qualities.  It is available in a wide palette of beautiful colours that includes key artists colours and One Stroke colours chosen from the Folk Art Colour collection.
Folk Art Enamels are water based and non-toxic, they dry to an opaque finish with a gloss sheen.  Cleanup (only while wet) is easy with soap and water.  Not only that, but pieces painted with Folk Art Enamels can be hand washed and are "top rack" dishwasher safe after leaving to cure for 21 days.

Friday, January 29, 2010

Other Possibilities

Using One Stroke techniques and brushes there are lots of possibilities to paint other things, here's a wedding cake that I painted recently using a set of mini One Stroke brushes.

Sue Gait - Certifying Elite One Stroke Instructor

Sue Gait (pictured here on the right) is a Certifying Elite One Stroke Instructor, this means that she can teach One Stroke painting to would be instructors and issue their instructor certificates.
Sue, a lively and friendly lady is also a wonderfully patient and generous teacher, "don't think about it, just do it" she says as we watch a ribbon come flowing out of the tip of her brush.
Taking lessons from Sue is like a day at the spa and she will treat you well, true Italian style!

Check out Sue's website HERE

Thursday, January 28, 2010

Left Handed Painters

If you are a left handed painter:

  • Always start where the RTG/Practice sheets say to end your stroke
  • Always end where the RTG say to start your stroke
  • When you are stroking leaves, turn your practice sheets or worksheets so you stroke the tip of the leaf towards your body
  • Experiment by turning your paper at different angles

Fabric Painting


I mentioned in a previous post how it was possible to paint on fabric using the One Stroke method, here is a video of Donna Dewberry painting on a t-shirt not even using the 'proper' OS technique!  How cool to  paint on the old shirt that you use to cover up your clothes with when you paint?

Co-Op Girls - First Class

I hope that you all enjoyed the first class this semester as much as I did, it was great to see so many signed up for this class (we'll have two more next week).  I thought that you all did wonderfully well with your first One Stroke experience.  Here is some information which we covered in class which I hope you will find helpful:

  • Always keep your workstation tidy!
  • Wear an old shirt/t-shirt to class, you WILL get paint on your clothes and it does not come off
  • Your water caddy goes on your right hand side at the top of the table
  • Your pallet goes to your right if you are right handed or to your left if you are left handed
  • Your kitchen towel folded twice goes slightly under your pallet 
  • Your brushes must be cleaned after each lesson and wrapped in plastic
  • As soon as you get home, clean your brushes again using Dawn Blue dish washing soap washing well several times using the same back and forth movement (as when you load your brush) clean your brushes on the back of your hand.
  • Wipe the brush over a bar of soap or on to a puddle of hair gel to 'set' the brushes into their chisel position and allow to dry flat 
You will find it useful to:
  • Keep old shirts
  • Bring a small towel or cloth to wipe your hands on (paint on hands means paint on your projects)
  • Bring a plastic container large enough for your pallet and your brushes (there will not be time to properly wash them in class, but they must be rinsed and put into a container before they dry) until you can get home to clean them properly
  • Keep styrofoam dishes that you can use as a pallet or buy a plastic pallet from Walmart or the Dollar Store and cover with Glad Press and Seal (which you simply peel off and throw away)
  • Always take note of the colour combinations used in class as these are usually 'best case scenario' colours, those that will give you the best shading effect.  Buy only Folk Art paints for your projects, there IS a difference between them and the Dollar Store varieties and it is false economy to think that you will get the same result with a different paint.  Folk Art paints were designed for this technique other acrylic paints were designed for other techniques
  • Practice between classes
  • Play some soft music and relax while you paint, you will find that you slow down and enjoy your painting more.  Get some nice 'room smellies' and a good lamp to shine on your work
  • Don't jump ahead, try to use the colours provided/recommended and don't try to improvise between classes (unless you are using the practice sheets provided for that purpose) since you will likely teach yourself bad habits
  • Ask questions - all comments that you leave on this blog will be answered quickly
  • Check this blog at least once a week before class on Thursday morning, be sure to bring everything that is on the list of items to bring to class and note any special instructions.  If a class is cancelled it will be posted on this blog
Once again, you were all excellent today and I can't wait for next week.  In the meantime, happy painting!
Lynne


Tuesday, January 26, 2010

Other Supplies

There are hundreds of different supplies and goodies available to help you with the One Stroke technique.  Some helpful extras would be:

  • Brush Caddy/Water container for rinsing brushes and storing them
  • Tracing paper for tracing images, lettering etc
  • Brush Cleaner to regularly clean your brushes thoroughly and efficiently
  • Paper towels......you're going to need lots of these!
  • Transfer paper to transfer traced images or patterns on to your work
  • Brush roll to safely transport your brushes

Sunday, January 24, 2010

Floating Medium

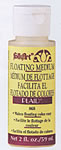
  Floating Medium 868 helps the paint stay wetter for shading and to create transparent paint effects.  If you wish to have your paint stay wetter longer or if you are painting on a porous surface such as paper, load the brush as instructed then dip the tip of the brush straight down into a squirt of floating medium.  Work two or three strokes on your palette and you are ready to paint.

Saturday, January 23, 2010

How To Get In The Mood To Paint

It is very important to paint in the right environment.  A well lit, comfortable environment will do a lot for your painting and your patience.  A little mood music, maybe even some scented candles can go a long way to make you relaxed and in the right mood to paint for hours.
When I took my OSCI course with Sue Gait (and Elite Instructor) she had beautiful music in the background, scented candles and a beautiful well lit studio, taking courses from her was as relaxing as a day in the spa!  I felt I could have painted for hours!
I realized that my 'studio' a kind of makeshift table in the laundry room (which was still better than taking over the dining room table and having to get everything out and put it all away every time I wanted to paint) was not conducive to painting for hours so I moved my art materials into our spare room.  Now I have an area in which I'm happy to paint and I enjoy it so much more.

Friday, January 22, 2010

Painting Surfaces

 One Stroke you can paint on almost any surface.  Often wood is used but sometimes glass, galvanized tin, candles, ceramic, fondant, walls, papier mache, leather and paper are used.  Remember to prepare your surface well before beginning to paint.
Use fine sandpaper to prepare wood surfaces and smooth raised grain between basecoats.

Thursday, January 21, 2010

Folk Art Acrylic Paints

 For all decorative painting, Folk Art acrylic paints give the best results, they dry quickly, are odour free, easy to use and come in a wide variety of colours.
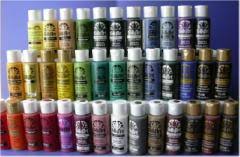
The One Stroke technique is based on the use of these paints exclusively for best results.  Their rich and creamy formulation and long open time make them perfect for all types of decorative painting.  They are offered in a huge range of wonderful, pre-mixed colours and lots of metalic and pearl shades.
Folk Art Artists' Pigments are colours that are perfect for mixing your own shades.  Their intense colours and creamy texture make blending, shading and highlighting easy.
If you are starting out and want to buy a small selection of  paint colours, you may like to know that the most commonly used paint colours in Donna's learning guides (and therefore in class) are:
Berry Wine
Wicker White
Thicket
School Bus Yellow
Yellow Ochre
Sunflower
Dioxazine Purple
Rose Garden
Maple Syrup
Licorice

The concept of One Stroke is that it is based on the use of two colours at any one time (sometimes three) both colours are opposites one light one dark, one that makes the highlights and one that makes the shadows. The mid range colours, while pretty and occasionally useful, are not easy to use with the One Stroke technique.

Sunflower Painted Cake


Cake painted with One Stroke Techniques - Sunflowers with edible paints.  If you are interested in learning this technique visit the Canadian Cake Decorators Guild website.  It is not difficult to paint on fondant if you have learned the One Stroke technique and are comfortable with it.  However, having a well applied fondant is something that can be a little tricky and is well worth learning to do properly before launching into it's use.

Remember:  Do not use your normal painting brushes to paint on cakes, you must use NEW brushes, first sterilized by being dipped in alcohol.  Obviously you can't use floating medium or any of the Folk Art paints.  You must always use edible paints!

Monday, January 18, 2010

One Stroke Rose - My Way


This isn't the traditional One Stroke rose technique, simply because the edges of the roses haven't been 'wiggled' but are quite rounded.  The finished result is very similar, just a little different.

Friday, January 15, 2010

One Stroke Brushes


Brushes are the foundation for the One Stroke Technique, and learning how each brush is used is important and a fun part of the painting experience! And, to make it even easier, each One Stroke worksheet pack, book and DVD will indicate exactly what type and size of brush to use.
Two of the most used Brush Types are Flat Brushes and Scruffy Brushes. These brushes, when combined with the paint, instructions and worksheets, make painting fun and easy!
• One Stroke Flat Brushes have longer bristles and less thickness than other flat brushes, so they have a much sharper chisel edge. A sharp chisel edge is essential as strokes start and end on the chisel edge. Flat brushes are used for painting roses, flowers, leaves, and ribbons. For the beginning painter, it’s easier to work with larger brushes, for example a ¾” or #12 Flat, than smaller brushes. Dampen the brush in water and pat dry. Technique Tip: Double Loading is an easy way to mix two colors of paint together on a palette to create a variety of color within a single brush stroke.
1. Dip a corner of the brush into each of two colors, allowing the paint to meet in the middle of the bristles.
2. On the palette, stroke the brush back and forth, spreading the paint out and also pulling more paint into the brush.
3. Re-dip each corner with the same color paint, and get ready to paint! To clean Flat Brushes, rake the bristles gently across the bottom of the Brush Caddy, or wash with warm soapy water. Pat dry.
• One Stroke Scruffy Brushes are a lot of fun to use. Remove the brush from the package and gently pull the bristles into an oval shape. Then, twist the bristles gently in the palm of your hand, while maintaining the oval shape.
Technique Tip: This brush is not used with water. To clean after painting is finished, gently pounce the bristles in the Brush Caddy - don’t rake them, as the bristles can break. Allow brush to dry completely before using again.
Loading the Scruffy Brush: follow the same instructions as double loading the flat brush, but, instead of stroking the brush back and forth, pounce the Scruffy Brush up and down to spread out and pull in more paint – and push hard!

Monday, January 11, 2010

Rose Painted Cake

Cake painted with edible paints using One Stroke techniques.  The whole process is a little more involved than when painting on a surface, it is impossible to remove any mistakes, but the overall look of the cake when finished makes it all worth while.  Finding the 'paints' that suit your style takes a while, but it's worth trying out a few edible mediums before you settle on the one you like.  The Canadian Cake Decorators Guild offer Painting on Cakes classes and it is well worth considering before painting on tiered wedding cakes.  It is also worth considering taking a fondant course so that your fondant is evenly and properly smooth and well applied to give you a good base on which to paint.  A Wilton Course 3 is offered  both at the Canadian Cake Decorators Guild and some Michaels and Bulk Barn stores.   How about start with cookies first?  Fondant is available at the Bulk Barn or Michaels Craft Stores and is easy to work with if you follow the instructions.  You can use a smear of  buttercream or piping gel (also available from these stores) otherwise the fondant will not stick to the cookie.  You can also buy fondant sheets that are very thin, smooth sheets of fondant ideal for painting or printing on.  Simply paint your picture (with edible paints of course) then apply it to your cake covered with buttercream or fondant.   For more information visit Kopy Kake.Royal icing can also be used to cover your cookie, but remember to allow a couple of days between applying the icing and applying the paint because otherwise your paint will 'blur' as it is absorbed into the icing.

Saturday, January 9, 2010

Buying One Stroke Paints


Looking for paints?  Hofcraft.com have the best prices anywhere.  Currently with up to 50% off paints!

One Stroke Books

Looking to enlarge your One Stroke Library?  CLICK HERE to go to a EBayer selling 29 Official One Stroke Books for just $26.95.  Shipping to USA is free, but to Canada shipping is $25.00 because the parcel is 13lb, that's a lot of books!


Techniques Guide: Painting on Paper    #1
Furniture Accents                                   #2
Wall Shelves                                           #3
Cottage Decor                                         #4
Yard Art for All Seasons                         #5
Outdoor Florals                                       #6
Decorating Your Home                           #7
Mailboxes                                               #8

Fountains and Birdbaths                         #9
Outdoor Decor                                        #10
Paper Painting                                         #11
Paper Crafts                                            #12
Cards & Greetings                                  #14

Paper Creations                                      #15
Painted Celebrations                              #16

Bake-able Glass Painting                       #17
Glassware Gifts                                      #18
Jars & Ivy Bowls                                    #19
Small & Pretty (A)                                 #20
Small & Pretty (B)                                 #21
Lifestyle: Gathering Places                    #22
Gifts to Remember                                 #23
Special Moments                                    #24
Roses of all Kinds                                  #25
A Summer Garden                                 #26
Beautiful Backgrounds                          #27
Furniture Fantasy                                  #28
Country Bugs                                        #29
Petite-Pretty Keepsakes                        #30

This is a Great Opportunity to Get the Books you Want as a full set for a Discount!